How to install Arch on Btrfs with LUKS encryption and software RAID1
This tutorial is written for my own future reference, but I’m also posting it online in case it helps someone else looking for a similar setup. While the first post on this series already laid out my specs, motivations and technological choices, this one will focus on implementing the core parts of my personal subsystem: an encrypted Arch Linux installation on top of Btrfs, with RAID1.
0. Overview
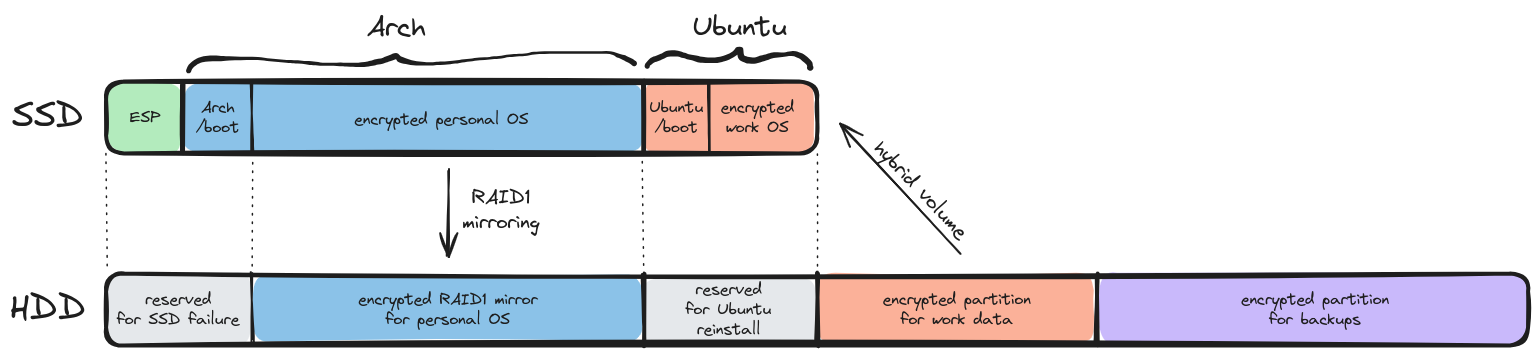
Here’s a sketch of what I’m aiming for:
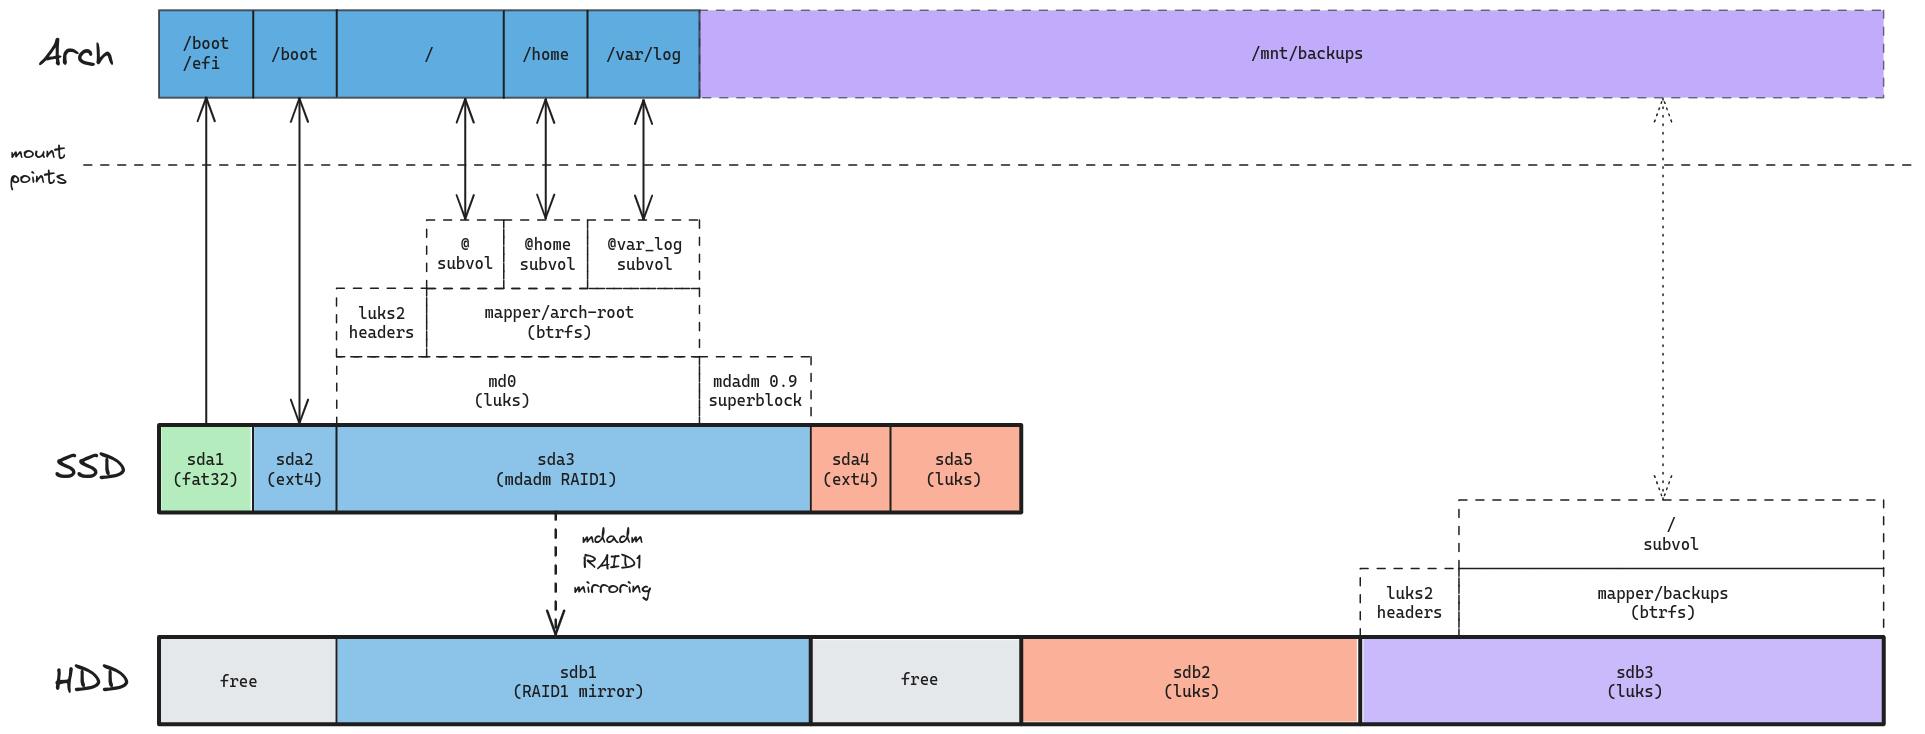
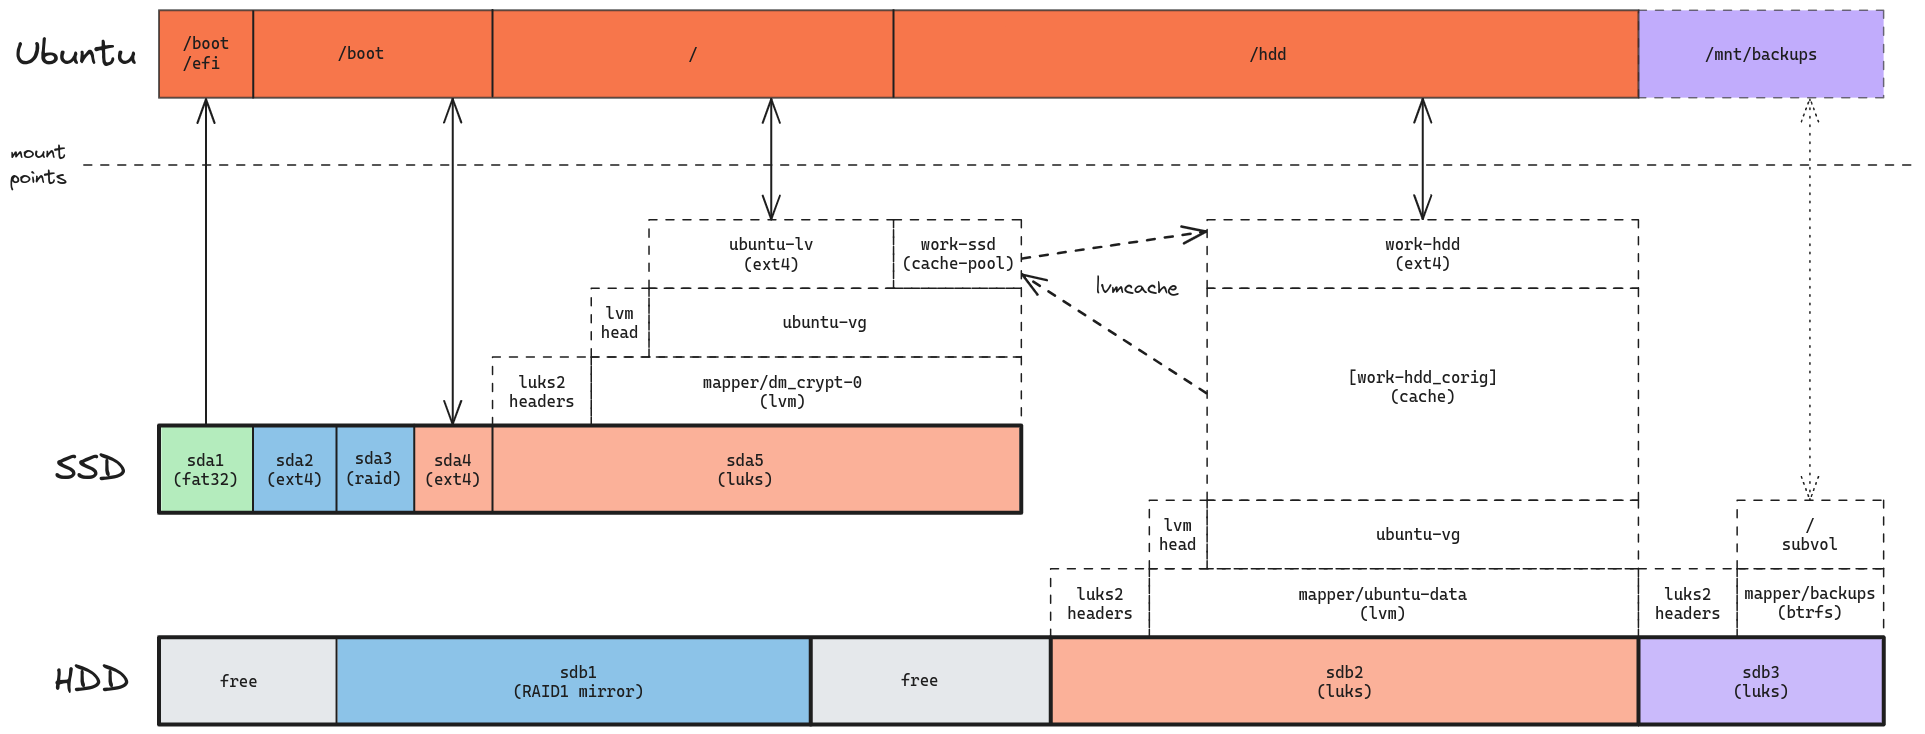
During the previous part of this series, I’ve used the Ubuntu 24.04 LTS guided installer to create an ESP partition (sda1, in green) and the core parts of my work subsystem (sda4 and sda5, in orange).
This post will set up the remaining SSD partitions, as well as the HDD RAID1 mirror.
I’ll follow the general structure of the Arch wiki’s installation guide, with a few added comments and highlighting deviations from the standard route for my customizations.
1. Pre-installation
1.1. Acquire an installation image
Just download the latest ISO image from the official Arch download page.
1.2. Verify image hashes
Make sure the ISO’s sha256sum matches the expected hash (1b4a04ef8a7350852a13070ee498442b087a607a18840b4dd7d99867eb5f6a4c for 2024.05.01).
1.3. Prepare installation medium
Flash the image on a USB stick.
1.4. Boot the live environment
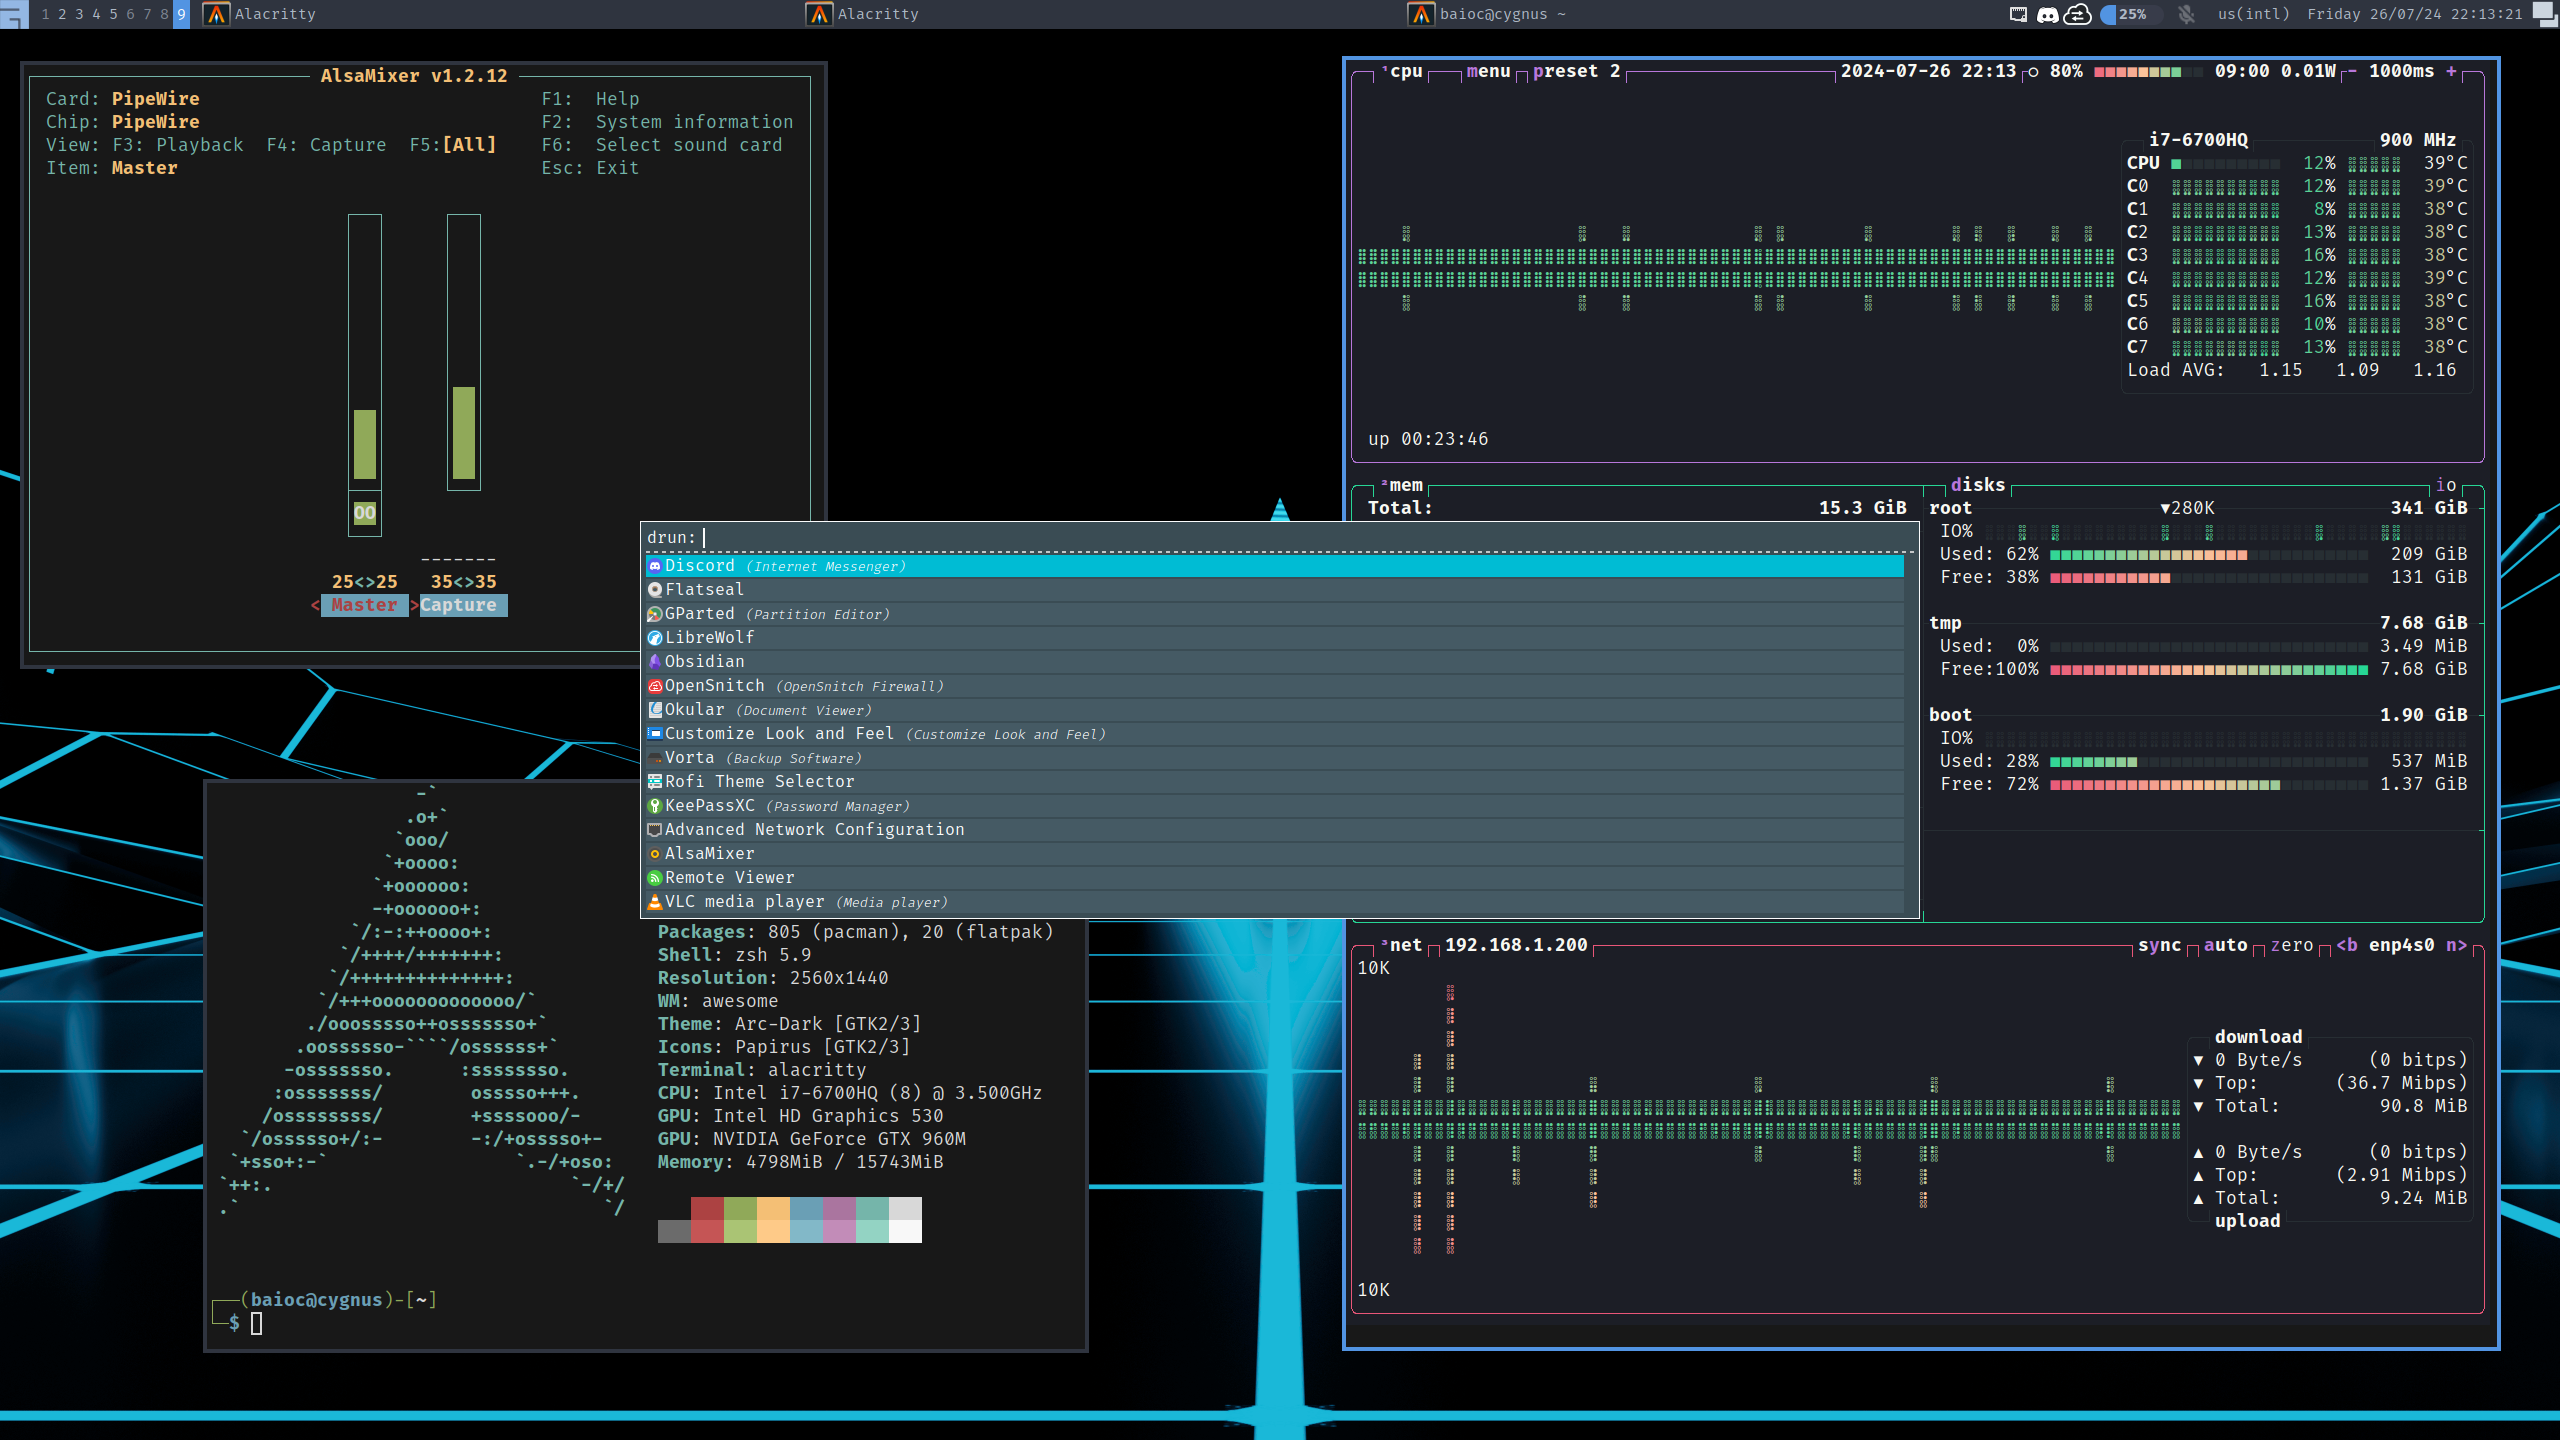
You’ll find yourself logged as root in a Zsh shell. These pacakges come pre-installed.
1.5. Set the console keyboard
Nothing to do here, since I use a US keyboard layout.
1.6. Verify the boot mode
cat /sys/firmware/efi/fw_platform_size should read 64.
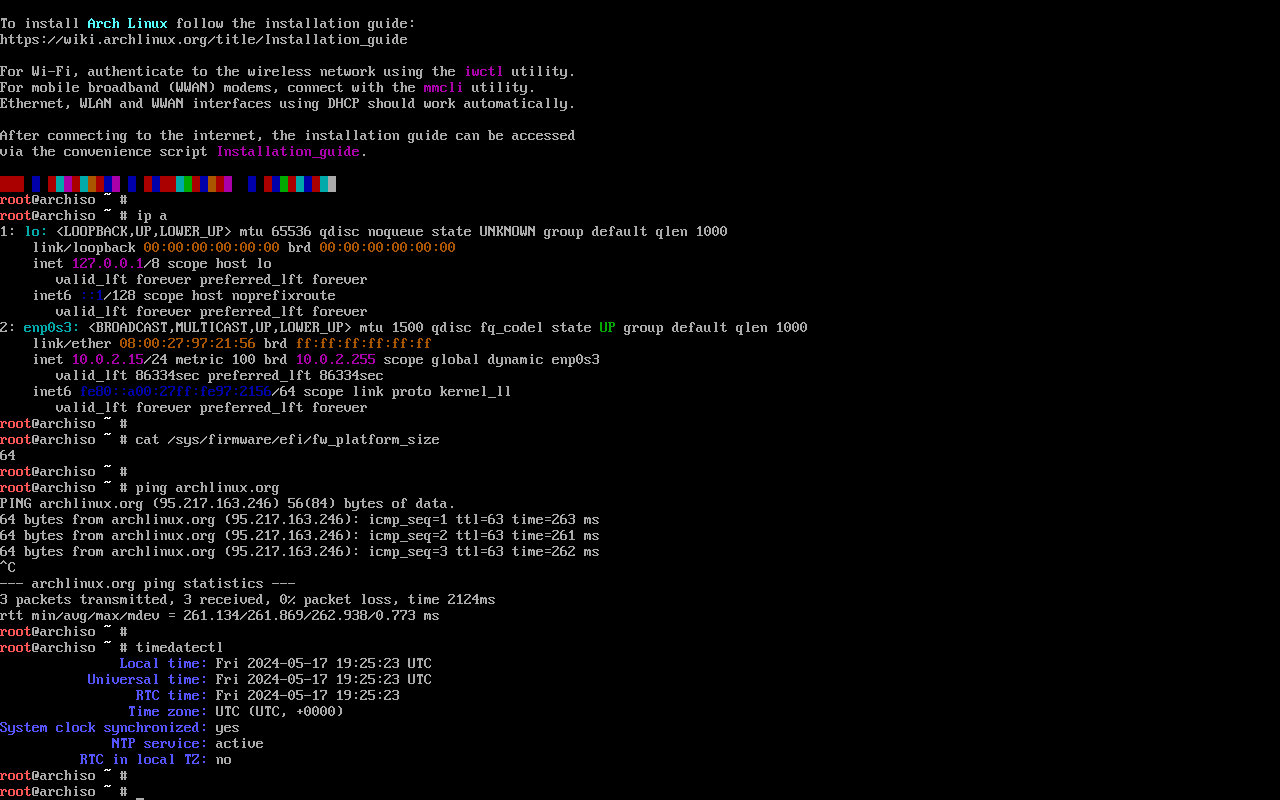
1.7. Connect to the internet
Just use ethernet.
The live system connects automatically using DHCP.
Make sure your connection is actually working by pinging an external server.
1.8. Update the system clock
Check if the output of timedatectl looks sane (in UTC+0).
1.9. Partition the disks
This is where it gets interesting. I already know how I want to partition my disks, but here are a few highlights copied straight from the Arch wiki:
- Take time to plan a long-term partitioning scheme to avoid risky and complicated conversion or re-partitioning procedures in the future.
Done.
- The following partitions are required for a chosen device: one partition for the root directory
/; for booting in UEFI mode: an EFI system partition.- If the disk from which you want to boot already has an EFI system partition, do not create another one, but use the existing partition instead.
- Swap space can be set on a swap file for file systems supporting it.
We already have an EFI partition created by the Ubuntu installer, so we’ll keep using that.
Then, instead of a single root partition mounted at /, we’ll create separate root (/) and boot (/boot/) partitions, since we want the former to be encrypted (and the latter can’t be, depending on the second-stage boot loader we end up using).
Finally, if swap is needed at all I’ll just use a swap file, since that’s supported on our filesystem of choice, Btrfs.
Aligning partitions correctly avoids excessive read-modify-write cycles. A typical practice for personal computers is to have each partition’s start and size aligned to 1 MiB (1 048 576 bytes) marks. This covers all common page and block size scenarios, as it is divisible by all commonly used sizes - 1 MiB, 512 KiB, 128 KiB, 4 KiB, and 512 B. Warning: Misaligned partitions will prevent being able to use 4096 B sectors with LUKS.
This important disk performance tip was hidden away in the Advanced Format page. Even though most disk partitioning tools default to MiB alignment, I think this should be highlighted in the partitioning step of the installation guide.
If you want to create any stacked block devices for LVM, encryption or RAID, do it now.
1.9.1. Securely erasing a drive
I’m going to err on the side of caution and securely erase my entire HDD:
wipefs -a /dev/sdb
cryptsetup open --type plain -d /dev/urandom --sector-size 4096 --cipher aes-xts-plain64:sha256 --key-size 256 /dev/sdb to_be_wiped
dd if=/dev/zero of=/dev/mapper/to_be_wiped status=progress bs=1M
cryptsetup close to_be_wiped
Here I’ve manually specified the fastest (according to a cryptsetup benchmark) combination of cipher and key size, as well as the physical sector size of my HDD (obtained with lsblk -t).
1.9.2. Physical partitioning
This is what our disks looked like after our encrypted Ubuntu 24.04 installation:
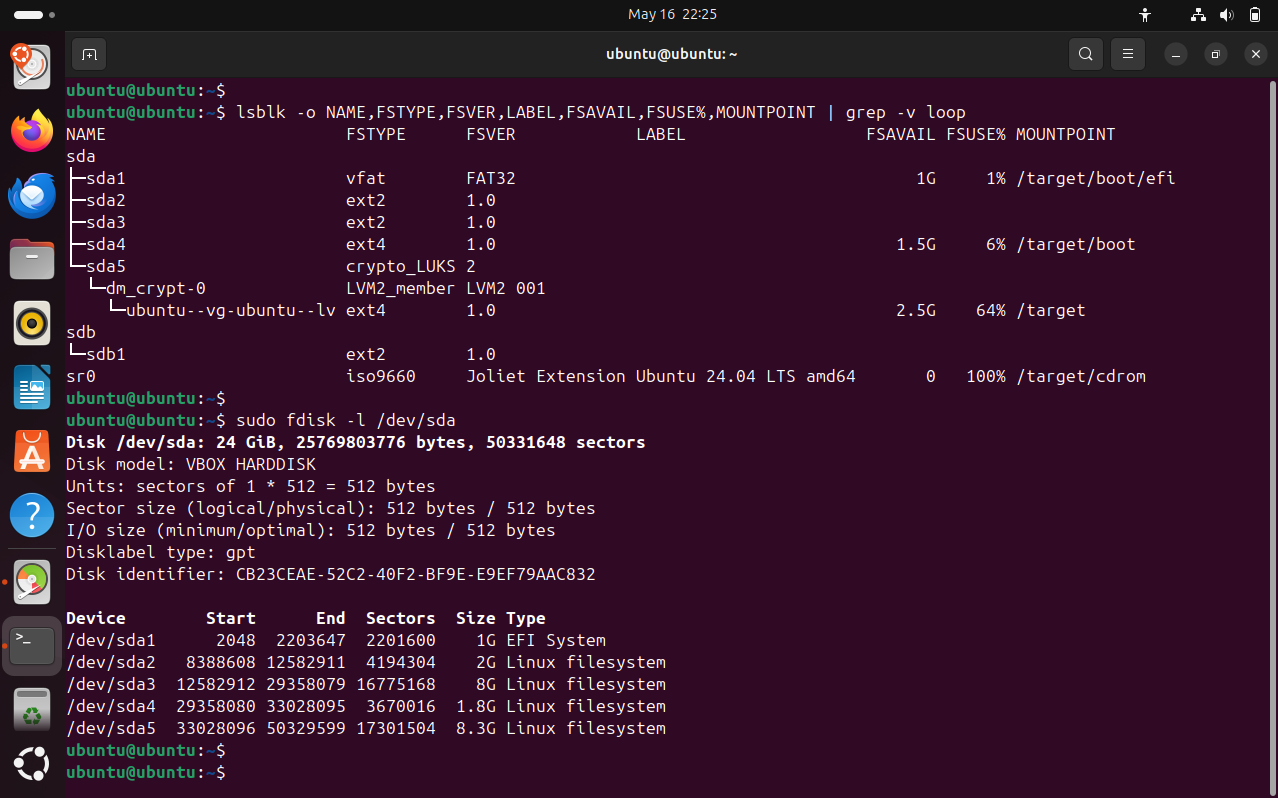
Everything on the SSD is already MiB aligned.
You can check that manually by running fdisk -l and making sure the start sector and total sectors assigned to each partition are divisible by 8.
Then, I’ll just wipe the placeholder ext2 file systems which I used to “hide” available disk space from the Ubuntu installer:
wipefs -a /dev/sda2
wipefs -a /dev/sda3
As for the just-erased HDD, I’ll use fdisk’s interactive shell to:
- Set up a fresh GPT partition table (
g) - Create a new partition the exact same size of
/dev/sda3(n) - Commit my changes (
w)
1.9.3. RAID on hybrid storage
We’ll now set up software RAID1 using mdadm.
In my particular case, I’ll have a hybrid RAID1 setup: one of the mirrors is in an SSD, while the other is in an HDD.
Thankfully, mdadm has a “write-mostly” flag which can mark expected-to-be-slower devices (/dev/sdb) in the array in order to make most reads come from the faster device (/dev/sda).
Setting it up is as simple as:
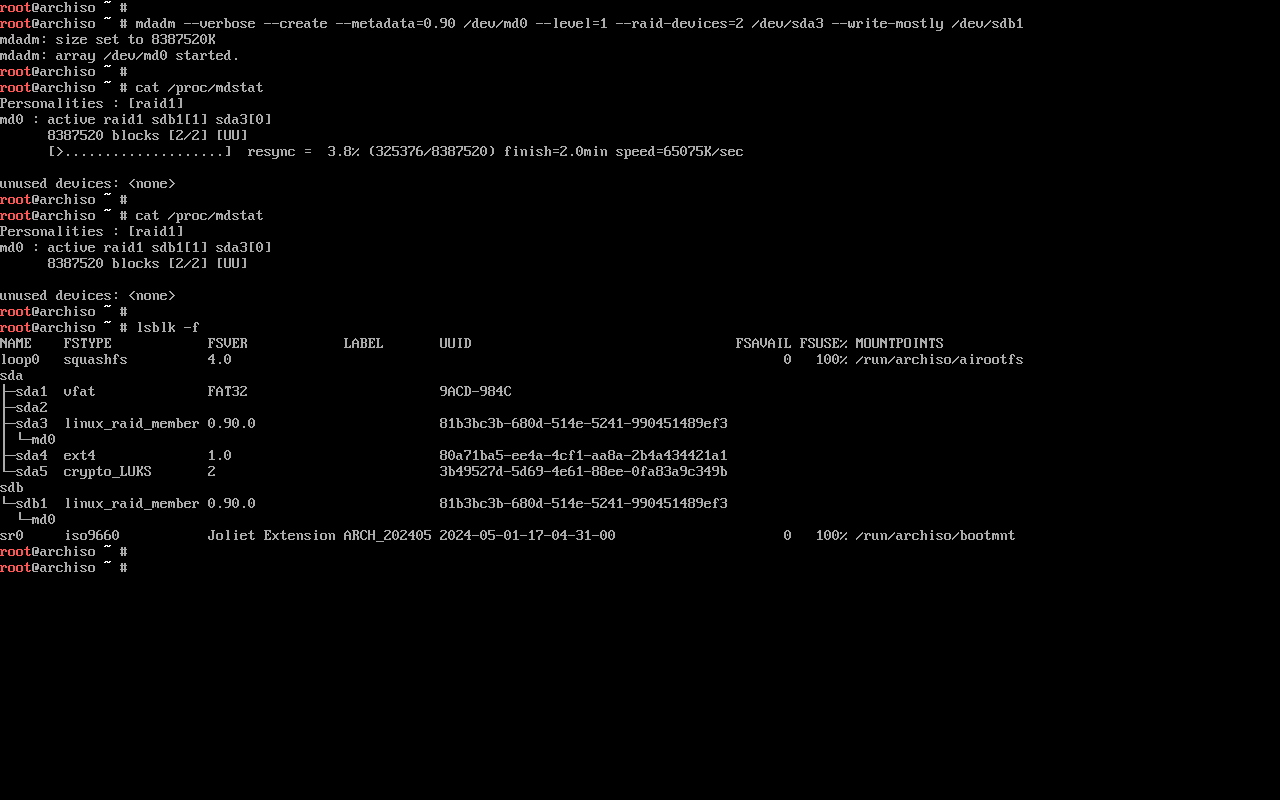
mdadm --verbose --create --metadata=0.90 /dev/md0 --level=1 --raid-devices=2 /dev/sda3 --write-mostly /dev/sdb1
Before continuing, watch /proc/mdstat to make sure the array had enough time to resync.
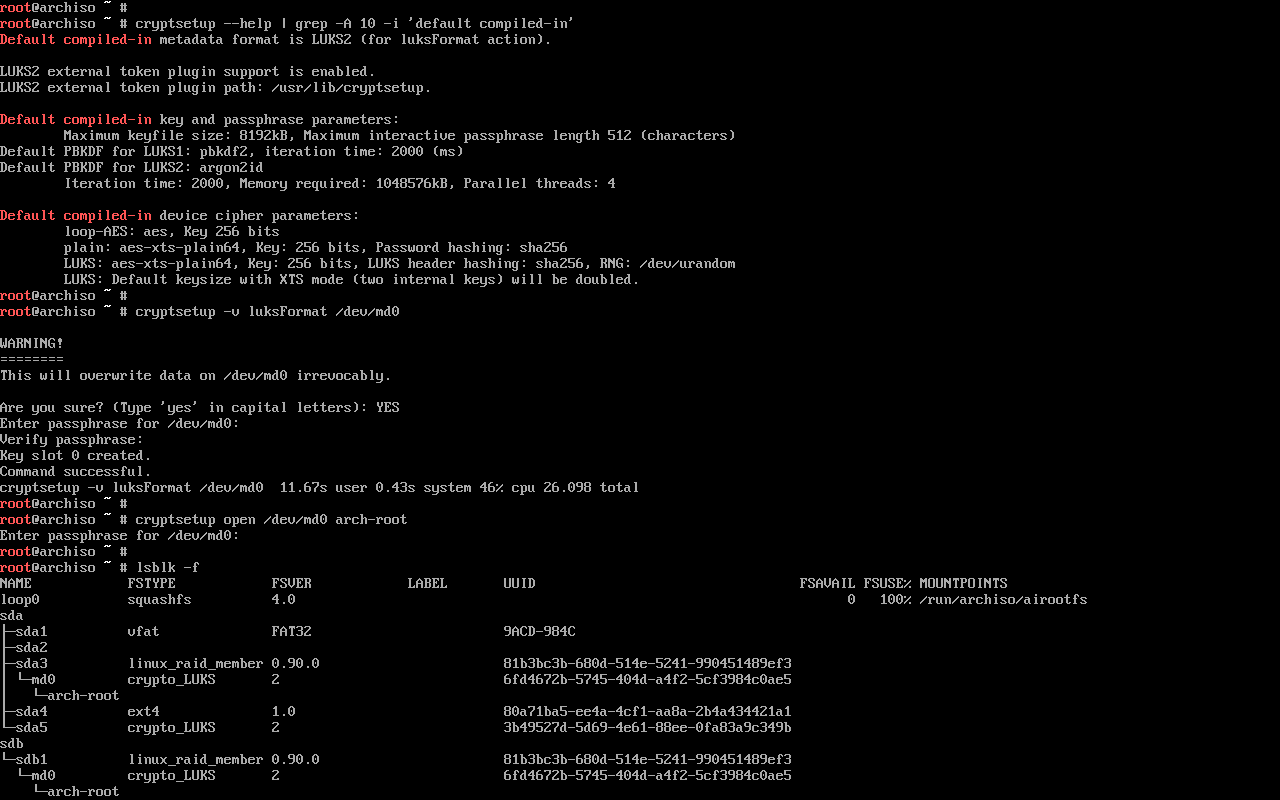
1.9.4. LUKS encryption
Setting up dm-crypt / LUKS encryption on top of a RAID1 array is also quite simple:
cryptsetup -v luksFormat /dev/md0
cryptsetup open --allow-discards /dev/md0 arch-root
1.10. Format the partitions
As planned, I’ll use ext4 for my boot partition and Btrfs (on LUKS, on RAID) for the rest:
mkfs.ext4 /dev/sda2
mkfs.btrfs /dev/mapper/arch-root
1.11. Mount the file systems
I’ll start by temporarily mounting my Btrfs root at /mnt.
mount -o defaults,compress=zstd:1,ssd,discard=async,noatime /dev/mapper/arch-root /mnt
- Compression is one of the reasons I chose Btrfs, and after looking at a few benchmarks, it seems that
zstd:1is the best compromise on compression ratio and CPU usage. - Apparently, Btrfs does not add
ssdordiscardoptions by default when it is mounted on top of LUKS/RAID, so I’ll add those manually. - Finally, I use
noatimein order to avoid unnecessary writes on the hybrid RAID1 setup, since they’ll have HDD speeds and I want to preserve SSD read performance.
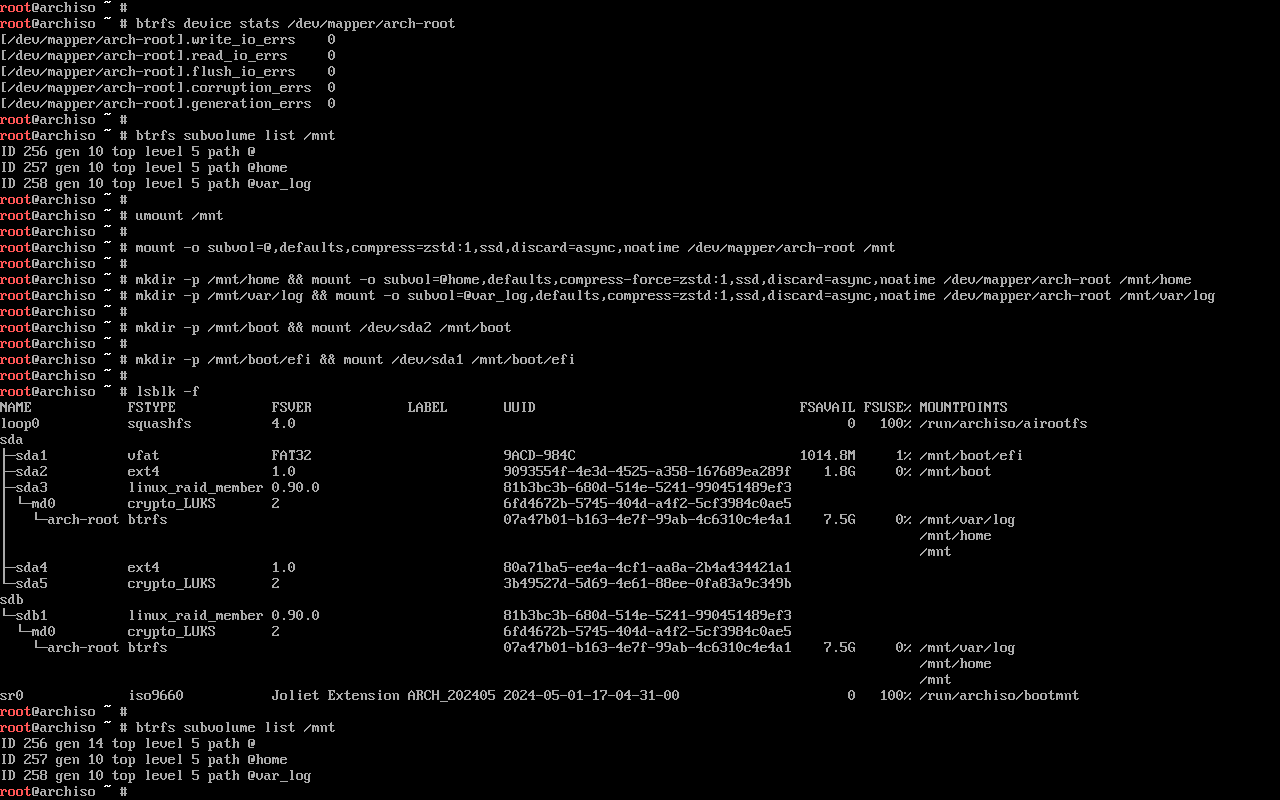
Now, since the filesystem is empty, this is probably the most convenient moment to set up other Btrfs subvolumes.
I’ll follow the suggested filesystem layout for Snapper, with separate subvolumes @ and @home for / and /home respectively, then @var_log to exclude /var/log from root snapshots (note: I may have to create more subvolumes in the future in order to have separately-snapshottable containers, databases, and the like).
btrfs subvolume create /mnt/@
btrfs subvolume create /mnt/@home
btrfs subvolume create /mnt/@var_log
Now, in order to actually use the @ subvolume as our / mountpoint (as opposed to mounting / directly on the root subvolume a.k.a. subvolid=5), we’ll unmount the current root:
umount /mnt
And then set up mountpoints (subvolumes and normal partitions alike) in the way they’re actually going to be used in the installed system, in hierarchical order:
mount -o subvol=@,defaults,compress=zstd:1,ssd,discard=async,noatime /dev/mapper/arch-root /mnt/

mkdir -p /mnt/home
mount -o subvol=@home,defaults,compress-force=zstd:1,ssd,discard=async,noatime /dev/mapper/arch-root /mnt/home

mkdir -p /mnt/var/log
mount -o subvol=@var_log,defaults,compress=zstd:1,ssd,discard=async /dev/mapper/arch-root /mnt/var/log

mkdir -p /mnt/boot
mount /dev/sda2 /mnt/boot

mkdir -p /mnt/boot/efi
mount /dev/sda1 /mnt/boot/efi
2. Installation
2.1. Select the mirrors
reflector -p https -l 100 --sort rate -n 20 --save /etc/pacman.d/mirrorlist
2.2. Install essential packages
This is where we decide what packages we want in our initial install:
pacstrap -K /mnt \
  base sudo systemd less which lsof \
  linux-zen linux linux-firmware \
  intel-ucode \
  e2fsprogs dosfstools cryptsetup lvm2 mdadm btrfs-progs \
  networkmanager bind whois wget curl \
  nano vim \
  man-db man-pages \
  refind efibootmgr mkinitcpio \
  base-devel cmake git python gnupg openssh diffutils \
  bash-completion htop tree xxd dmidecode usbutils perl-image-exiftool sysstat bat inxi
3. Configure the system
3.0. Update RAID config file
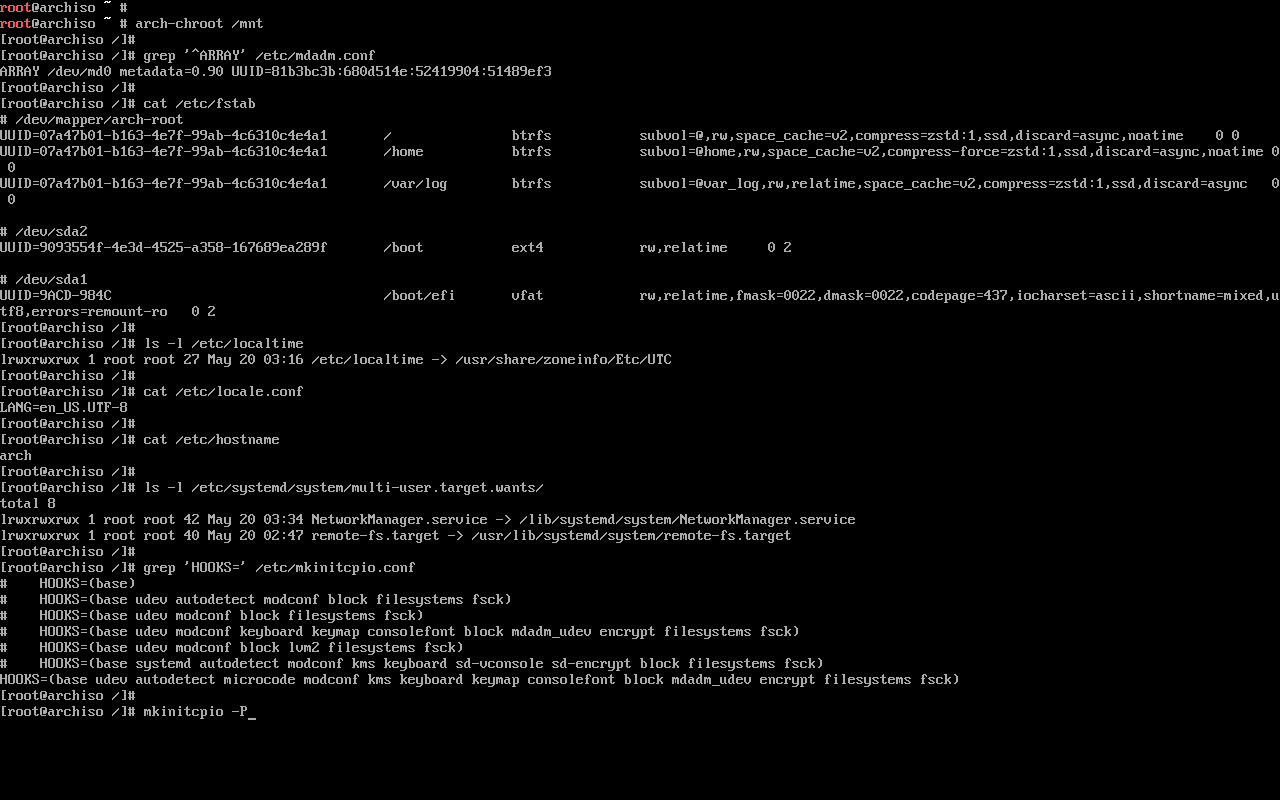
Since we’re using RAID, we need to update the default mdadm configuration file:
mdadm --detail --scan >> /mnt/etc/mdadm.conf
Then open it on a text editor to make sure it looks OK.
3.1. Fstab
Similarly, for the fstab file:
genfstab -U /mnt >> /mnt/etc/fstab
3.2. Chroot
Now, we’ll be chrooting into the new system:
arch-chroot /mnt
3.3. Time
If you want the system’s local time to be in your own timezone instead of UTC:
ln -sf /usr/share/zoneinfo/$REGION/$CITY /etc/localtime
hwclock --systohc
3.4. Localization
Edit /etc/locale.gen and uncomment en_US.UTF-8 UTF-8, as well as any other needed UTF-8 locales.
Then, generate the locales and set the system locale with:
locale-gen
echo 'LANG=en_US.UTF-8' > /etc/locale.conf
3.5. Network configuration
Create a hostname file:
echo 'my-cool-hostname' > /etc/hostname
And, in my case, I’ll manually enable the NetworkManager systemd unit:
ln -s /usr/lib/systemd/system/NetworkManager.service /etc/systemd/system/multi-user.target.wants/
3.6. Initramfs
In this setup, where I’m using LUKS encryption and software RAID, I needed to add mdadm_udev and encrypt to my initramfs hooks in /etc/mkinitcpio.conf:
HOOKS=(base udev autodetect microcode modconf kms keyboard keymap consolefont block mdadm_udev encrypt filesystems fsck)
Then, in order to actually apply these changes and recreate the initramfs image:
mkinitcpio -P
3.7. Root password
We can then set the root password with passwd.
3.8. Boot loader
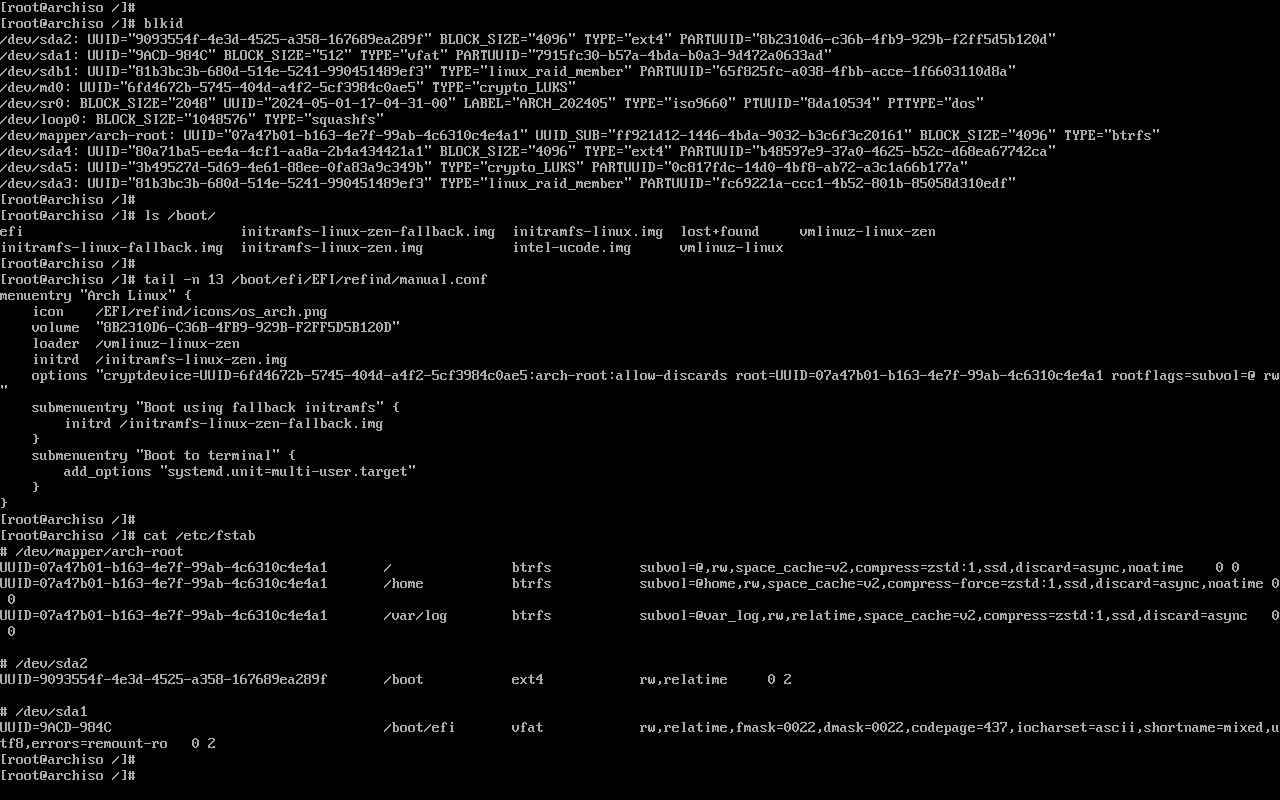
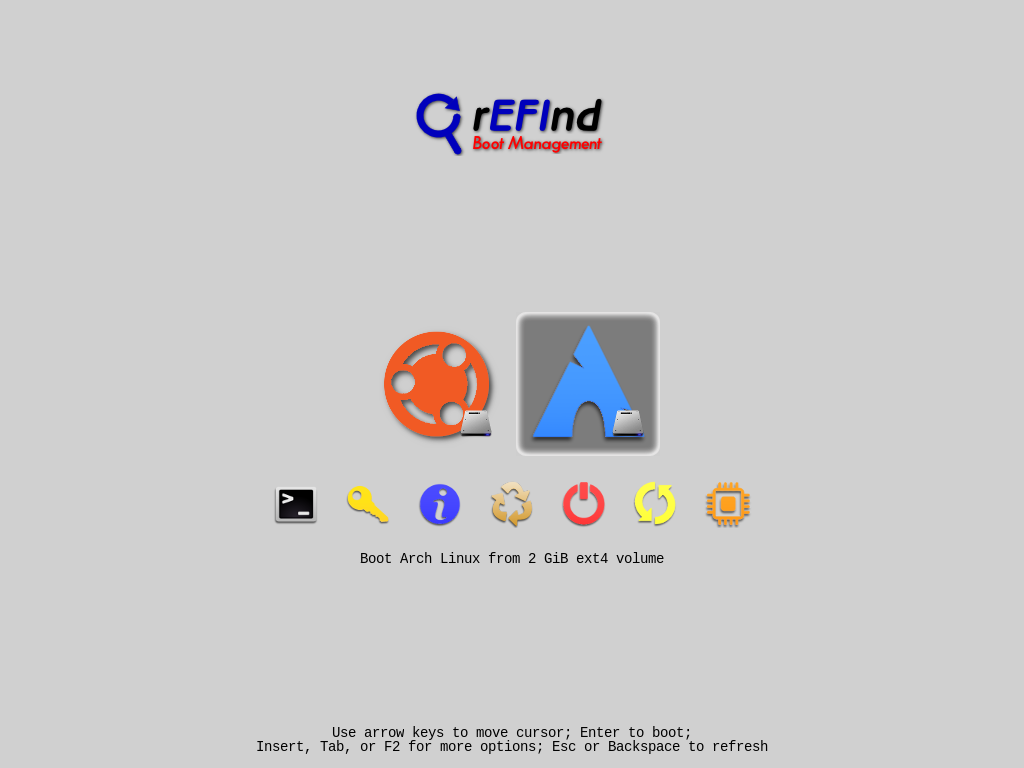
In my case, I’ll use rEFInd (which I already installed in the pacstrap command):
refind-install
rm /boot/refind_linux.conf
cp /boot/efi/EFI/refind/refind.conf /boot/efi/EFI/refind/refind.conf.bak
After creating a backup of the original config, I edited /boot/efi/EFI/refind/refind.conf to reduce the boot timeout, to add support for the naming scheme of Arch Linux kernels and to enable the inclusion of a separate manual.conf config file.
# refind.conf
...
timeout 5
...
extra_kernel_version_strings "linux-hardened,linux-rt-lts,linux-zen,linux-lts,linux-rt,linux"
...
include manual.conf
Then, I like to set up a manual boot stanza in /boot/efi/EFI/refind/manual.conf, which reads:
# manual.conf
menuentry "Arch Linux" {
	icon    /EFI/refind/icons/os_arch.png
	volume  "8B2310D6-C36B-4FB9-929B-F2FF5D5B120D"
	loader  /vmlinuz-linux-zen
	initrd  /initramfs-linux-zen.img
	options "cryptdevice=UUID=6fd4672b-5745-404d-a4f2-5cf3984c0ae5:arch-root:allow-discards root=UUID=07a47b01-b163-4e7f-99ab-4c6310c4e4a1 rootflags=subvol=@ rw"
	submenuentry "Boot using fallback initramfs" {
		initrd /initramfs-linux-zen-fallback.img
	}
}
- We need to specify the
icontoken before choosing a bootvolume. - The
volumetoken is set to the PARTUUID of my/bootpartition (/dev/sda2). loaderandinitrdpaths are set using the specifiedvolumeas a root, so we don’t need to prefix those with/boot.- The
cryptdevicekernel option must be set with the UUID of a block device ofTYPE="crypto_LUKS", which corresponds to my software RAID block device. - The UUID in the
rootkernel option should match the/entry in myfstab. - Since my root filesystem is mounted in a non-default Btrfs subvolume, I need to specify
rootflags=subvol=@as well.
4. Reboot
If everything was set up correctly, we should be able to reboot into our freshly-installed system:
- Leave the chroot environment by exiting the current shell
- (Optionally) unmount partitions with
umount -R /mnt reboot- Choose the correct option in our boot loader of choice
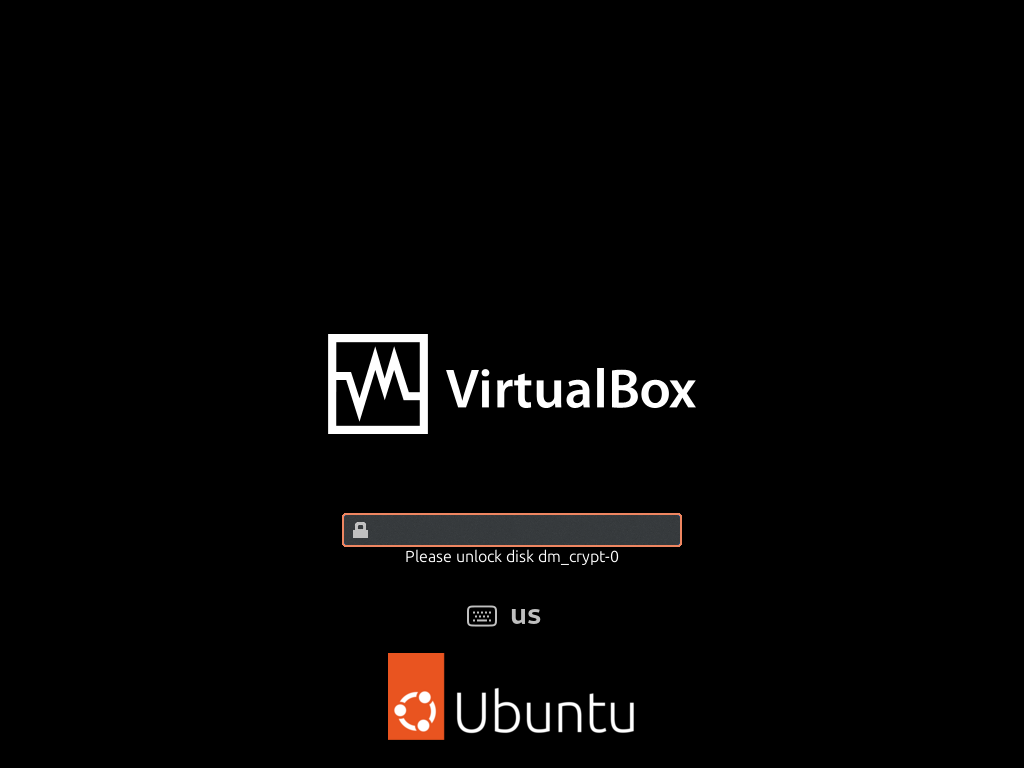
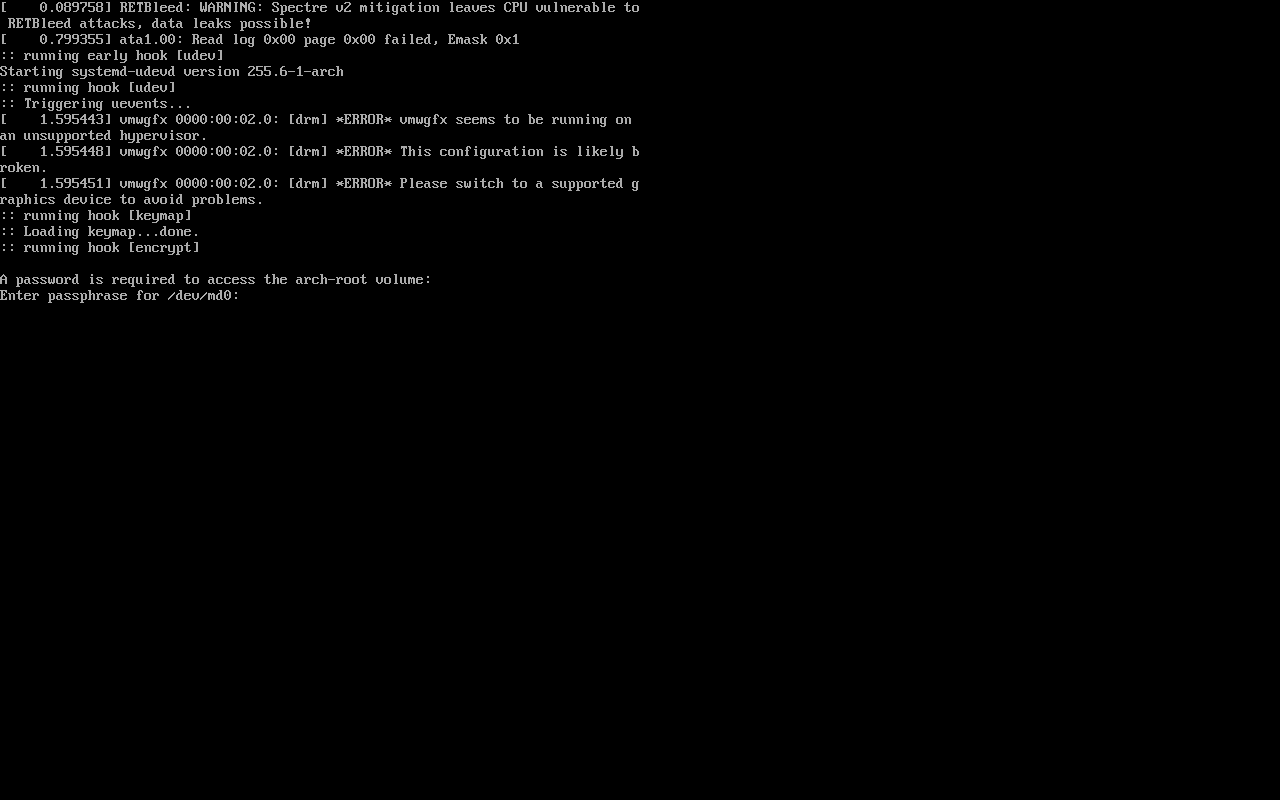
You’ll then be prompted for your disk encryption password before fully booting:
5. Post-installation
All done! I’ll leave any further post-installation steps to another post.