How to set up an X-based desktop from scratch
In the final post of this dual-boot series, I’ll show how to go from a base Arch install:
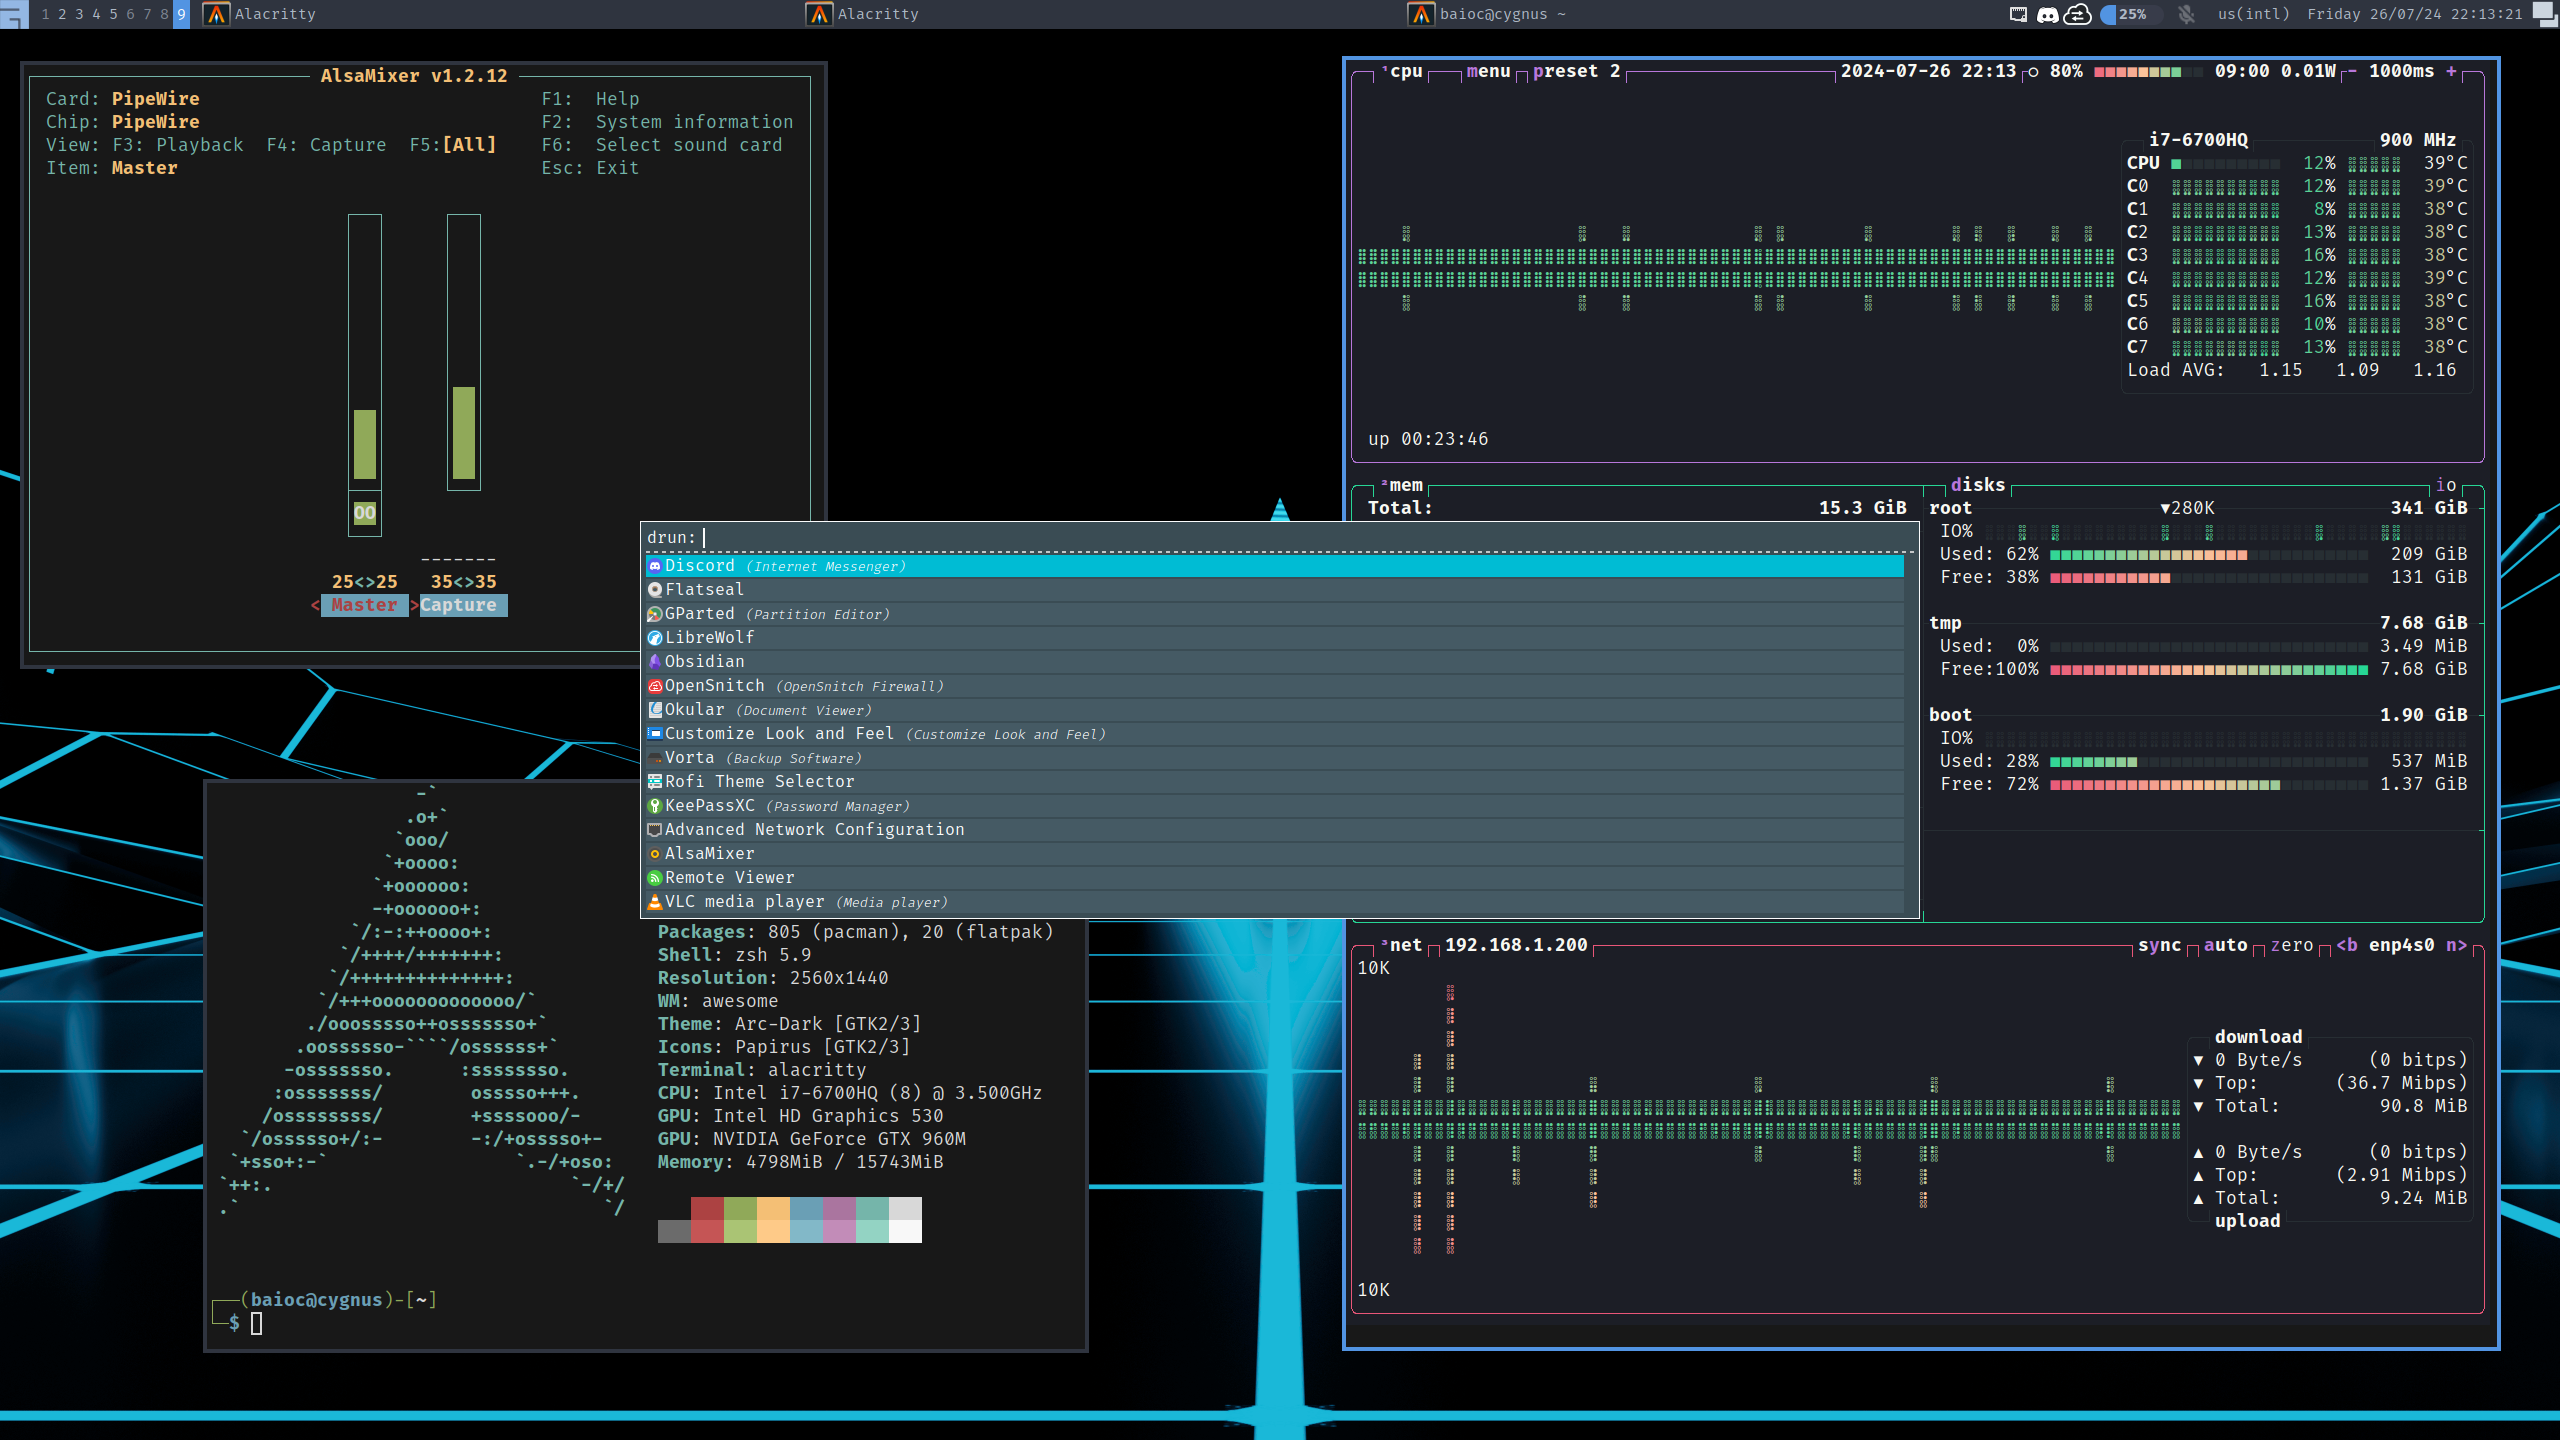
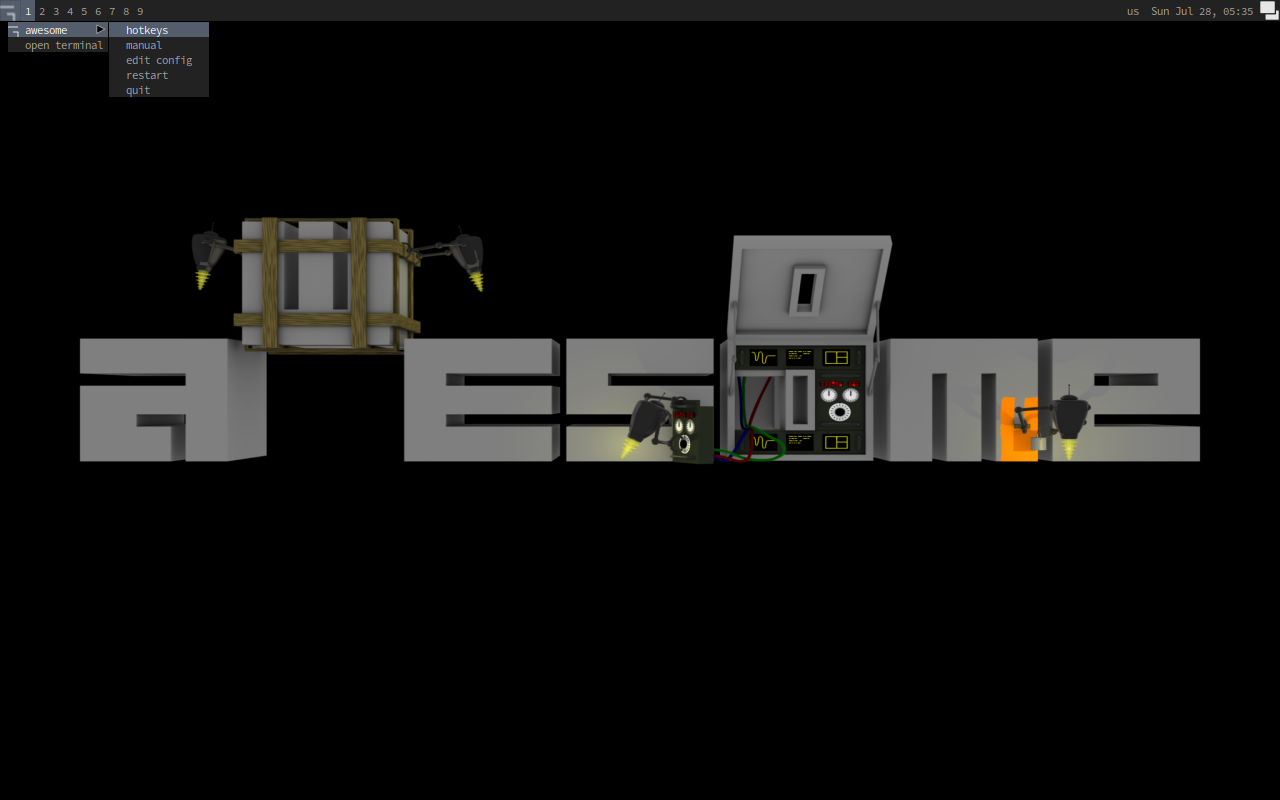
To a simple awesomeWM desktop environment:
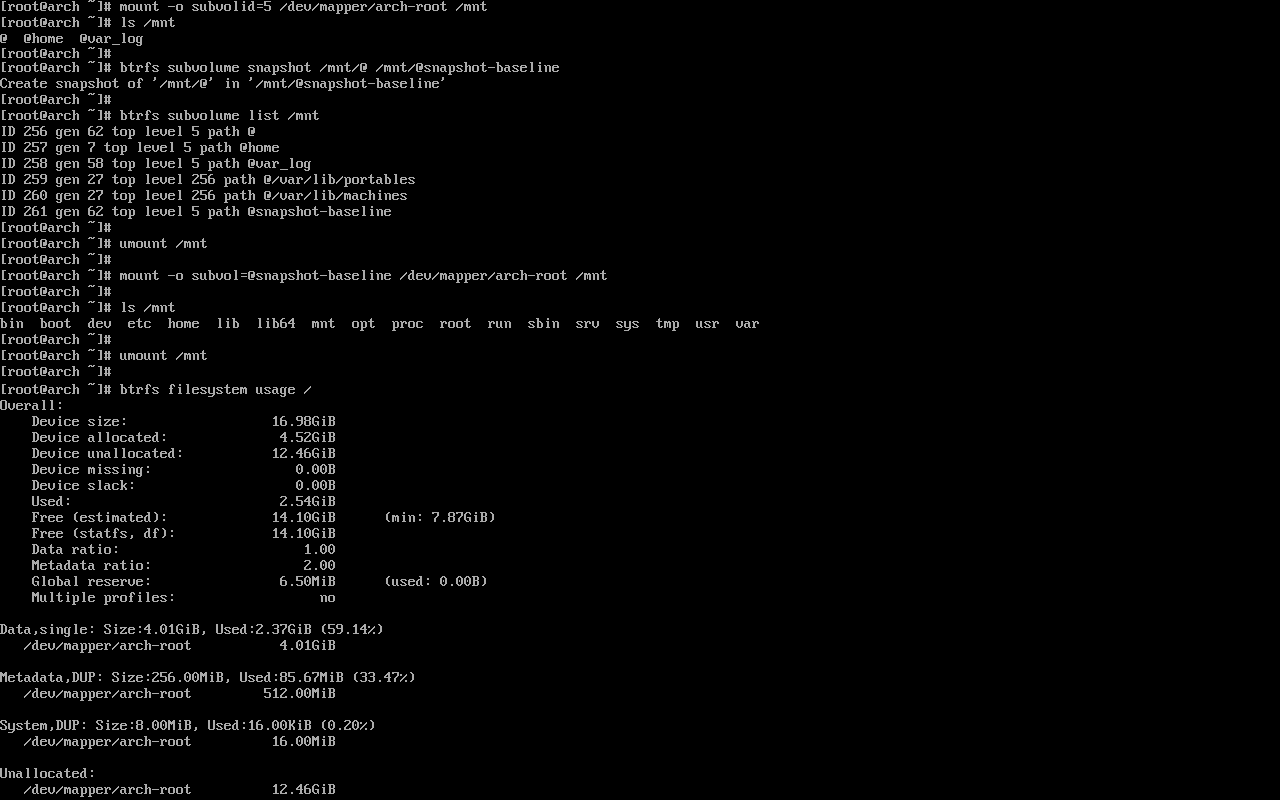
0. Manual btrfs snapshot
Btrfs’s snapshot capability is one of the reasons I chose this file system, so before anything else I’ll use that to make a backup of the entire root partition. While I’ll create the snapshot manually this time, later in this tutorial I’m going to show how to set up automatic backups.
$ mount -o subvolid=5 /dev/mapper/arch-root /mnt
$ btrfs subvolume snapshot /mnt/@ /mnt/@snapshot-baseline
$ umount /mnt
That’s all it takes, and you’ll notice it’s also instant thanks to btrfs copy-on-write.
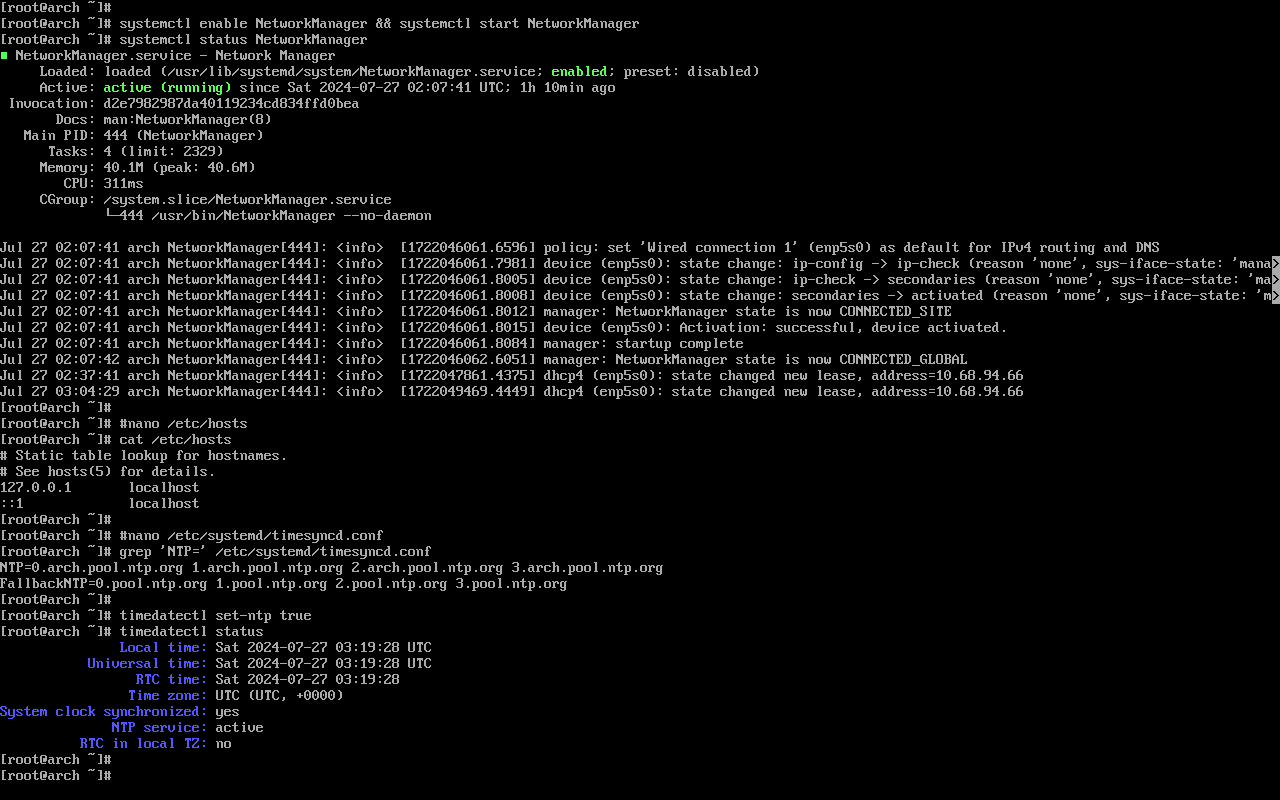
1. Network and time
During installation, I made sure that the NetworkManager systemd service would auto-start.
In case you forgot to do that before, this is a good time to run:
$ systemctl enable NetworkManager
$ systemctl start NetworkManager
I also like to always resolve localhost to … well … the local host.
So I make sure that my /etc/hosts file contains the following entries:
127.0.0.1        localhost
::1              localhost
Since I also want my system time to be correct, I’ll also enable the built-in NTP service:
$ timedatectl set-ntp true
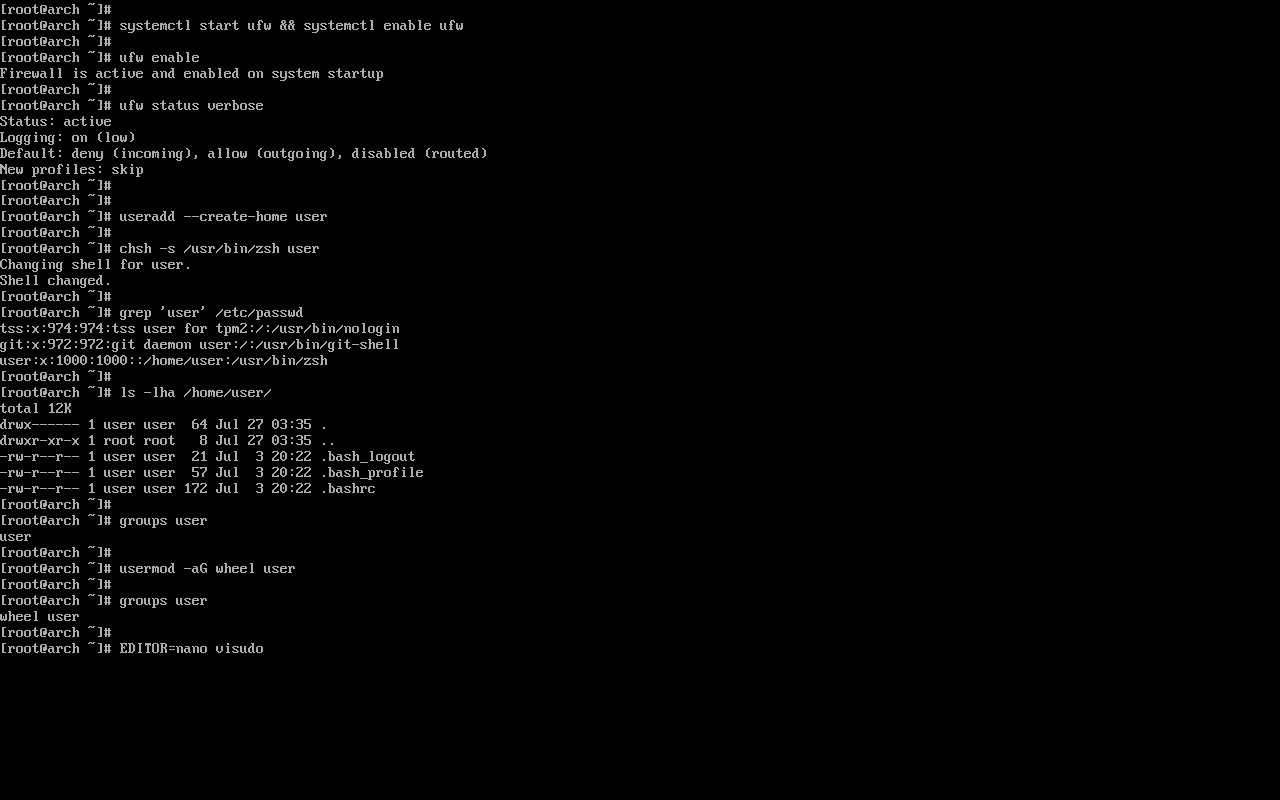
2. Firewall
The first thing to do after connecting to the internet is setting up protection - a firewall, in this case. I like ufw, which is pretty easy to install and enable by default:
$ pacman -S ufw
$ systemctl enable ufw
$ systemctl start ufw
$ ufw enable
$ ufw status verbose
Status: active
Logging: on (low)
Default: deny (incoming), allow (outgoing), deny (routed)
New profiles: skip
The default configuration is already the best option for most desktop users: deny all incoming traffic (connections initiated in the network) and allow all outgoing traffic.
Personally, I also like to use OpenSnitch to block all outgoing traffic by default, then handpick exceptions based on program, protocol and target address & port. I know this is too much of a nuisance for most people, so I’ll leave this out of the tutorial.
3. Non-root user
Even if I’m the only person using this system, it’s more secure to do it from a non-root user by default.
The following commands create a user called user with their own home directory, sets a password, then installs zsh and sets that as user’s default shell.
$ useradd --create-home user
$ passwd user
$ pacman -S zsh
$ chsh -s /usr/bin/zsh user
Then, in order to be able to perform administrative actions through sudo or Polkit, I’ll add user to the wheel group:
$ usermod -aG wheel user
And also update the sudoers file with EDITOR=nano visudo, making sure to uncomment the line that reads:
%wheel ALL=(ALL:ALL) ALL
You can now exit the current shell and log back in as the new user.
If you changed the default shell to zsh, you may also be prompted to do some initial configuration.
4. X initialization
We’re going to use X.Org as our window system, with awesome as a window manager. Furthermore, in order to access the shell from an X(11) session, we’ll also need to install a terminal emulator. We can get started by installing the necessary packages:
$ sudo pacman -S xorg-server xorg-xinit awesome alacritty
I want the Xorg server to start whenever I log in as user from the default tty1.
Implementing this is as simple as configuring the zsh login shell (~/.zprofile) to run startx:
# /home/user/.zprofile
if [ -z "$DISPLAY" ] && [ "$XDG_VTNR" -le 1 ]; then
    exec startx
fi
The startx program will then run the ~/.xinitrc script to start up client programs, including our window manager of choice.
We just need to copy the default script to the user’s home folder, remove the last few lines running programs we don’t have, and append exec awesome:
$ cp /etc/X11/xinit/xinitrc ~/.xinitrc
$ nano ~/.xinitrc

$ cat ~/.xinitrc
#!/bin/sh

# merge in defaults and keymaps

userresources=$HOME/.Xresources
usermodmap=$HOME/.Xmodmap
sysresources=/etc/X11/xinit/.Xresources
sysmodmap=/etc/X11/xinit/.Xmodmap

if [ -f $sysresources ]; then
    xrdb -merge $sysresources
fi

if [ -f $sysmodmap ]; then
    xmodmap $sysmodmap
fi

if [ -f "$userresources" ]; then
    xrdb -merge "$userresources"
fi

if [ -f "$usermodmap" ]; then
    xmodmap "$usermodmap"
fi

# start some nice programs

if [ -d /etc/X11/xinit/xinitrc.d ] ; then
 for f in /etc/X11/xinit/xinitrc.d/?*.sh ; do
  [ -x "$f" ] && . "$f"
 done
 unset f
fi

exec awesome
Since I’m the only one who’ll be using this system, I’ll also enable auto-login - this means I’ll only have to type in the disk decryption password before getting to my desktop.
$ sudo mkdir -p /etc/systemd/system/getty@tty1.service.d
$ sudo nano /etc/systemd/system/getty@tty1.service.d/autologin.conf

$ cat /etc/systemd/system/getty@tty1.service.d/autologin.conf
[Service]
Type=simple
ExecStart=
ExecStart=-/sbin/agetty -o '-p -f -- \\u' --noclear --autologin user %I $TERM
Environment=XDG_SESSION_TYPE=x11
That’s it! We can now reboot and drop into a barebones graphical desktop:
5. awesomeWM configuration
One of the first things you may notice if you’re following this tutorial is that the “open terminal” buttons and shortcuts are not working.
That’s because, by default, awesome is configured to use xterm, whereas we installed Alacritty.
You can still open Alacritty “manually”, either by typing alacritty in the command prompt (Super + R) or choosing it in the built-in application menu (Super + P).
After getting to a terminal, I suggest overriding the default configuration:
$ mkdir -p ~/.config/awesome/
$ cp /etc/xdg/awesome/rc.lua ~/.config/awesome/
$ nano ~/.config/awesome/rc.lua
Make sure to change the line that reads terminal = "xterm" to terminal = "alacritty".
In order to apply any changes, we need to reload awesome (Super + Ctrl + R).
We should now be able to open our terminal of choice with Super + Enter.
After that, I suggest taking a look at some awesomeWM configuration recipes in order to understand how to configure it, edit keybindings to your liking or add useful widgets.
Note that, at this point, you can use pacman to install your web browser of choice and use that to read the documentation directly from your just-configured graphical system.
For example, one of the first things I did was adding a blurry screen lock script:
#!/bin/sh

set -e

screenshot=$(mktemp /tmp/lock-screen-scrot-XXXXXXXXXX)
scrot --overwrite --format png -F "$screenshot"
magick "$screenshot" -blur 0x8 "${screenshot}-blur.png"
i3lock --image="${screenshot}-blur.png" --pointer=default --ignore-empty-password "$@"
After saving this to a file called lock-screen, we need to:
$ sudo pacman -S i3lock scrot imagemagick               # install programs used in the script
$ chmod +x lock-screen                                  # make the script executable
$ mkdir -p ~/.local/bin                                 # create a ~/.local/bin/ folder
$ echo 'export PATH=$PATH:$HOME/.local/bin' >> .zshenv  # append it to our user's PATH
$ mv lock-screen ~/.local/bin/                          # put the lock screen script there
Then, in order to launch it with Super + L, add the following snippet to the global keys section of ~/.config/awesome/rc.lua.
After restarting awesome, the new shortcut will also show up in the hotkeys help popup (Super + S), and will blur & lock the screen when activated.
awful.key(
    { modkey, }, "l",
    function() awful.spawn("lock-screen") end,
    { description = "lock the current session", group = "launcher" }
),
Another thing you might want to do is load a prettier built-in theme (before overriding it to your own tastes) - you can list the contents of /usr/share/awesome/themes to check what alternatives came preinstalled with awesome.
Then, you can change the beautiful.init() line in ~/.config/awesome/rc.lua, like so:
- beautiful.init(gears.filesystem.get_themes_dir() .. "default/theme.lua")
+ beautiful.init(gears.filesystem.get_themes_dir() .. "xresources/theme.lua")
6. Pipewire audio
A basic installation like the one we just went through mostly just works out of the box. I didn’t have to do anything other than plug in my HDMI monitor, wireless mouse and USB keyboard.
Soon enough, however, I realized that audio was missing. Desktop Linux is somewhat infamous for having audio issues, but I think PipeWire has made that a thing of the past. All we need to do is install a few packages (and possibly reboot), then it all just works:
$ sudo pacman -S pipewire \
    pipewire-audio pipewire-alsa pipewire-pulse pipewire-jack \
    wireplumber alsa-utils
You might want to set up keybindings for the following audio related commands:
$ alsamixer -V all                               # control audio in terminal
$ pactl set-sink-volume @DEFAULT_SINK@ -5%       # lower volume by 5%
$ pactl set-sink-volume @DEFAULT_SINK@ +5%       # increase volume by 5%
$ pactl set-sink-mute @DEFAULT_SINK@ toggle      # toggle audio mute
$ pactl set-source-mute @DEFAULT_SOURCE@ toggle  # toggle microphone mute
7. Pacman and snapshots
As promised, we’ll now set up automatic system backups, making use of btrfs snapshots. These are SYSTEM backups (of the root partition) and not DATA backups (does not include the home partition), intented to enable undoing a bad update or a breaking config change. You should configure additional backup schemes for user data.
With that disclaimer out of the way, let’s install snapper:
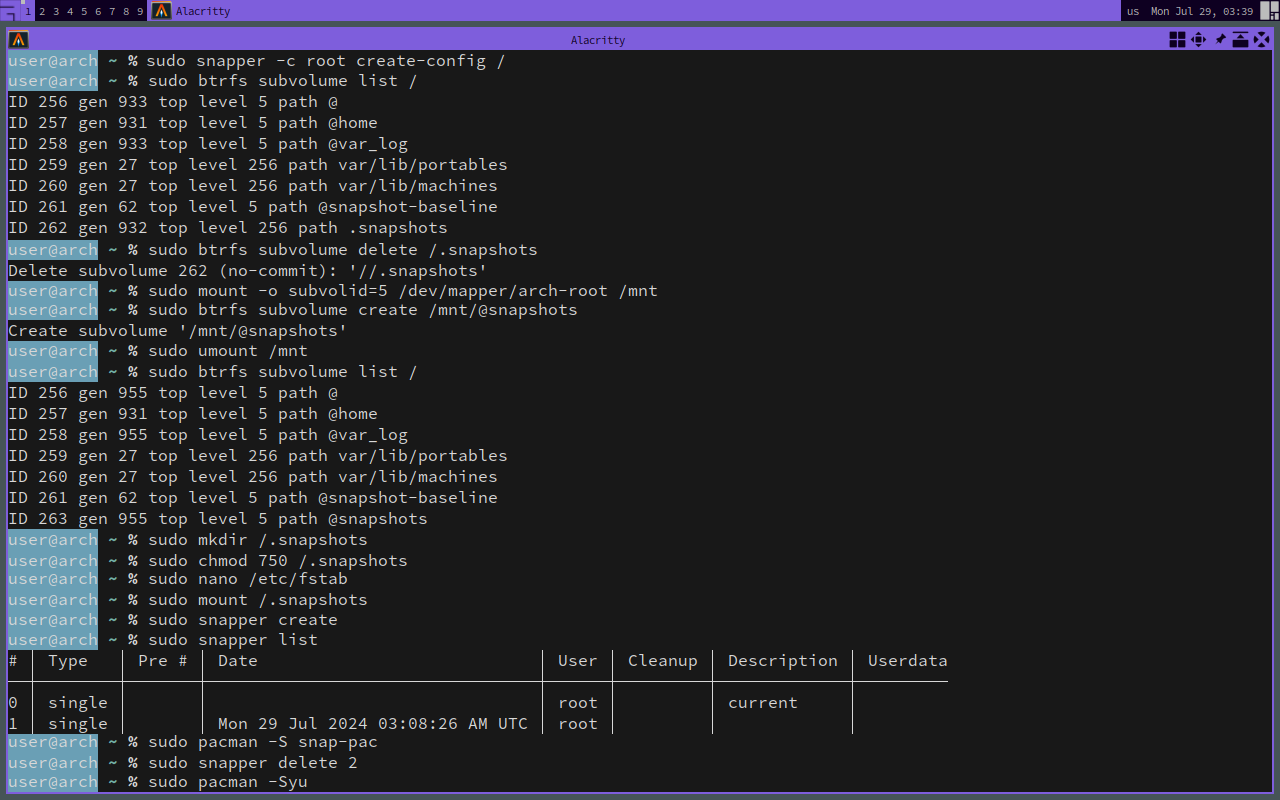
$ sudo pacman -S snapper
$ sudo snapper -c root create-config /
Snapper saves snapshots under the /.snapshots mount point; that’s OK.
The issue is that, by default, it creates a subvolume under whatever is currently mounted at /, but I would rather keep snapshots in the top-level of the btrfs volume structure.
Therefore, I’ll delete the just-created .snapshots SUBVOLUME and make a new one, mounted at /.snapshots:
$ sudo btrfs subvolume delete /.snapshots
$ sudo mount -o subvolid=5 /dev/mapper/arch-root /mnt
$ sudo btrfs subvolume create /mnt/@snapshots
$ sudo umount /mnt
$ sudo mkdir /.snapshots
$ sudo chmod 750 /.snapshots
$ echo 'UUID=${same_UUID_as_other_subvolumes}	/.snapshots	btrfs	subvol=@snapshots,rw,relatime,space_cache=v2,compress=zstd:1	0	0' | sudo tee -a /etc/fstab
$ sudo mount /.snapshots
Then, I’ll disable snapper’s default time-based backups:
$ sudo sed -i 's/TIMELINE_CREATE="no"/TIMELINE_CREATE="yes"/' /etc/snapper/configs/root
$ sudo systemctl stop snapper-timeline.timer
$ sudo systemctl disable snapper-timeline.timer
In order to create a snapshot manually, we can run snapper create.
To list existing snapshots, just use snapper list.
Each snapshot is a btrfs subvolume and can be mounted as such.
Now, in order to run backups every time we make a potentially breaking change, we’ll install snap-pac.
By default, it is configured to create a snapshot of the root partition before and after every time we modify the system with pacman (installing a package, updating the system, etc).
$ sudo pacman -S snap-pac
You can run snapper list to see the snapshot which was automatically created after installing snap-pac itself.
Personally, I preferred to snapper delete this initial one, just to make sure every change has a pre and post snapshot.
Although the current setup covers changes to the root partition, we might not be able to fully restore the system without kernel backups as well. The kernel is not currently being backed up, since it lives in the boot partition. Thankfully, the Arch Wiki has this covered by teaching us how to set up pacman hooks to copy the kernel from the boot partition to our snapshot-able root:
$ sudo pacman -S rsync
$ sudo mkdir /.bootbackup
$ sudo mkdir -p /etc/pacman.d/hooks

$ nano /etc/pacman.d/hooks/95-bootbackup_pre.hook
$ cat /etc/pacman.d/hooks/95-bootbackup_pre.hook
[Trigger]
Operation = Upgrade
Operation = Install
Operation = Remove
Type = Path
Target = usr/lib/modules/*/vmlinuz
[Action]
Depends = rsync
Description = Backing up pre /boot...
When = PreTransaction
Exec = /usr/bin/bash -c 'rsync -a --mkpath --delete /boot/ "/.bootbackup/$(date +%Y-%m-%d.%Hh%Mm%Ss).pre"/'

$ nano /etc/pacman.d/hooks/95-bootbackup_post.hook
$ cat /etc/pacman.d/hooks/95-bootbackup_post.hook
[Trigger]
Operation = Upgrade
Operation = Install
Operation = Remove
Type = Path
Target = usr/lib/modules/*/vmlinuz
[Action]
Depends = rsync
Description = Backing up post /boot...
When = PostTransaction
Exec = /usr/bin/bash -c 'rsync -a --mkpath --delete /boot/ "/.bootbackup/$(date +%Y-%m-%d.%Hh%Mm%Ss).post"/'
We can now run a full system update, with confidence that we can revert it in case things break. (In fact, it is a good idea to keep you Arch ISO live USB around, since restoring your system from these snapshots may require manual intervention).
$ sudo pacman -Syu
8. Other customizations
In the previous Arch tutorial, we went from a live USB to a minimal installation, with not much other than network connectivity.
In this one, we moved from a TTY login to a graphical desktop environment, with auto-login, a terminal emulator, a working audio system, automatic backups and a fully customizable window manager; with a web browser being just a pacman -S away.
The result might still look and feel too barebones for some people, but after this point each one can customize the system however they like. That’s the beauty of (Arch) Linux: this system is now yours, do with it whatever you want. Enjoy!